Sync Datasets Using Append and Update Sync Type
Append and Update Data Sync automatically pulls new and updated records from your sources, keeping your base and managed datasets current without unnecessary full reloads.
Before You Begin
In joined composite datasets, each joined entity can use its own Data Sync settings. Determine if you want to enable a full reload of the dataset or if you are adding append and update sync logic.
- Full Reload (default): Reloads the entire dataset.
- Append and Update: Pulls new or changed rows and merges them into the existing dataset. For more information, see Enable Append and Update.
Data Sync Tutorial
The following tutorial video shows how to add append and update sync logic to your dataset.
Tags: Data, Sync, Dataset
Enable Append and Update
To add append and update logic, a dataset entity needs to include the following attributes.
- Unique ID: At least one field must serve as a guaranteed unique identifier.
- DateTime column: At least one column must serve as a timestamp that contains the time when the record was added or updated. The sync process only pulls records newer than the time window of the last data load.
Unique Record Identifier
To identify which record to update during a sync, you must designate at least one field as a unique identifier. In some cases, a single column is enough. In joined entities, you might need to combine two or more fields to guarantee uniqueness.
You can add a unique ID to your dataset in the Columns tab.
-
Select the three-dot menu for a table row in the table.
-
Select Unique ID>On.
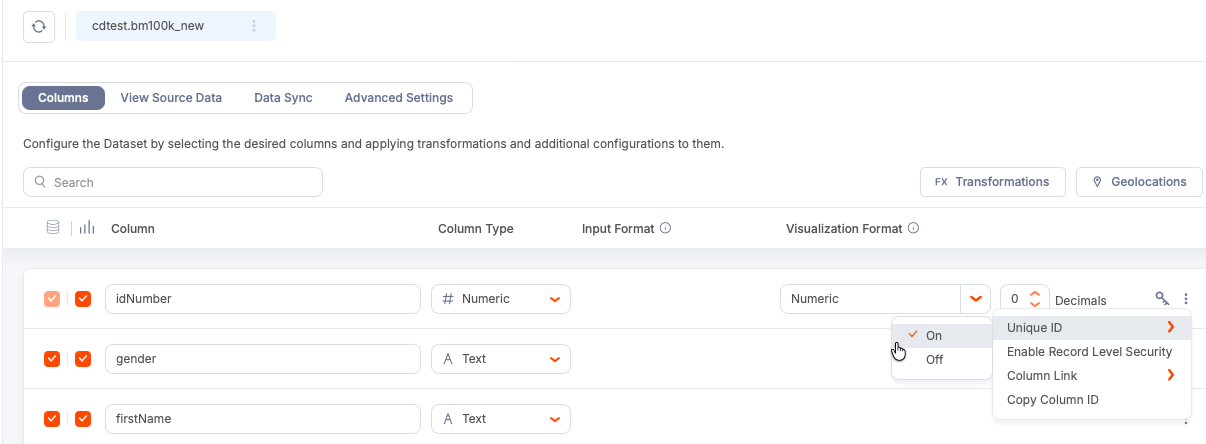
-
Use the Join Output pill to create a composite key for the ID.
For example, you can combine
ProductIDfrom the Product table with an inventory row GUID,rowguid, or another field that uniquely identifies the record in theProductInventorytable.
Note: When you add or change the unique identifier and apply the design changes, Qrvey triggers a full reload to enable Elasticsearch to rebuild indexes corresponding to the identifier changes.
DateTime Column
To enable incremental syncs, each data source entity must provide a DateTime column that stores times when records were added or updated. Typical choices include columns like ModifiedAt or LastUpdated. Qrvey uses the column entry as a timestamp to find records where the timestamp is betweem the last load and "now minus one minute".
You can select multiple columns for an entity. Multiple selections use OR logic. For example, a sync can detect records with a DiscontinuedDate or ModifiedDate that falls within the sync window.
Additional Data Sync Rules
- The sync window is the time period between the last time the sync ran (Query Start Time) and now (Query End Time). End time is the current time the query runs. You can change the query start time if you need to recover missed data, but the end time cannot be changed retroactively.
- If your database time zone differs from the AWS region where Qrvey is deployed, adjust the database time zone on the Data Sync page so the query converts to the correct time boundaries during execution.
File Sources That Do Not Require a Timestamp Column
If your dataset source is S3 or Blob storage, you do not need a timestamp column. Qrvey can use the file creation or modification timestamps in the storage location to determine which files contain new or updated data.
A file upload dataset source does not have an Append and Update option. Only Full Reload syncs are supported.
Set Up a Data Sync
The Data Sync pull-based mechanism runs queries on a schedule to detect new or changed records.
-
Select a managed or base dataset to edit.
-
Select the Data Sync tab.
-
In the Data Source Settings section, select a Sync Type (Full Reload or Append and Update) for each entity used in the join.
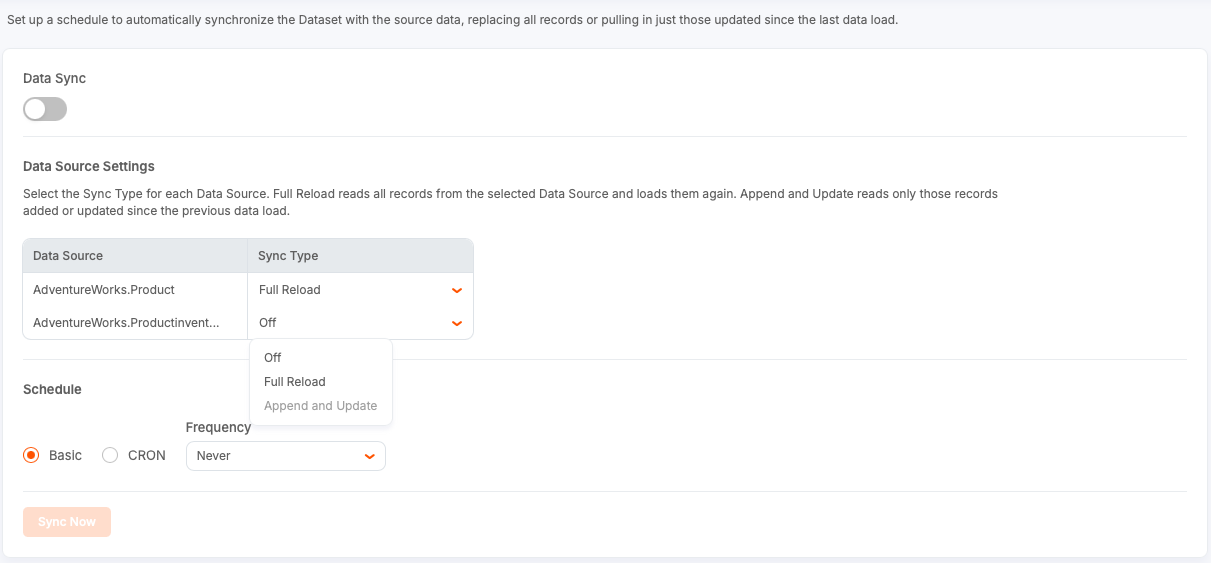
Tip: You do not have to sync all entities at the same frequency. This allows you to optimize performance and cost based on the frequency of changes for each data source.
-
Define the schedule for your data sync:
- Basic (default): Select a simple interval from the dropdown list.
- CRON: Enter a cron job expression for advanced timing. Select Test CRON Expression to test your entry.
-
Toggle Data Sync to enable Data Sync for your dataset.
-
Select Apply Changes to save your data sync configuration. Applying the Data Sync changes does not trigger a reload event. It commits the schedule configuration and enables the sync.
-
To test your setup, select Sync Now.
This test runs the incremental sync logic and creates an entry in the dataset activity log showing the time ranges used for each dataset, the number of records added or updated, and other statistics. You can check the log to verify that the sync pulled the expected rows.
Note: Do not use Reload Dataset to test Data Sync. Use Sync Now.
Troubleshooting
Append and Update Disabled
If append and update remains disabled after you select identifiers and timestamps, confirm that you selected Apply Changes in the dataset design. Design changes remain in draft until applied. Also check that your identifier makes records truly unique across the joined entities.
Checklist
- For each entity, select at least one timestamp column unless the source is S3 or Blob Storage.
- To enable the sync, toggle Data Sync on and select Apply Changes.
Best Practices
- A simple, accurate way to enable the detection of changes is to use a reliable modified timestamp column.
- When joining tables, think in terms of record uniqueness across the joined entities. Use composite keys when necessary.
- Document time zones for your data sources and adjust the DB time zone if you notice gaps in sync windows.
- Use
cronexpressions when you need precise control over timing. Otherwise, select a simple frequency.